Lavender is a beautiful and aromatic perennial plant. Its pleasant scent easily attracts butterflies, bees, and other beneficial pollinators. This greatly boosts wildlife if you decide to grow it in your garden. Moreover, you can even grow it in a container or pot indoors if you live in a flat or don’t have enough yard space. That’s a great way to guarantee your home smells wonderful!
The benefits of looking after this amazing plant are many, but perhaps you already know all of them. So, let’s get to the essential part where you will uncover the necessary steps to plant and grow your very own lavender!
Table of Contents
Choose your preferred lavender variety
There are many lavender species out there. However, we will focus on the ones that are most suitable to be grown in the UK climate.
- English lavender (Lavandula angustifolia / Lavandula x intermedia) – These two lavender types are very hardy. They are able to withstand temperatures lower than -12°C if not exposed. English lavender can thrive throughout the UK and produce flowers in June and July. Their leaves have a silver-grey to dark green colour, and the flowers have a lavender, pink or white colour.
- French lavender (Lavandula stoechas) – If deadheaded, French lavender can flower from May to September. It is able to handle some cold weather (-5 / -10°C), but not for an extended period of time. French lavender is best to be planted in containers, path hedges or in sheltered borders. It has narrow grey leaves and produces clumps of small purple flowers.
- Tender lavender (Pterostoechas) – This is probably the most delicate lavender type. Nevertheless, its beauty can be enjoyed all year long. However, it should be grown in pots and moved indoors when winter arrives. Tender lavender is able to withstand a temperature of around 5°C. Keep in mind, though, that this species produces spiky flower heads that have no aroma. Still, the leaves have an interesting scent and they spread and grow upright. Deadhead the plant regularly so it can keep blooming.
Growing lavender in different conditions

How to grow lavender from seeds
Growing lavender from seed can be difficult, even for experienced gardeners. It is possible that only a few seeds sprout, or none at all. However, don’t be discouraged by that. Just follow the steps of the process we will explain below and repeat if unsuccessful the first time. Patience and persistence certainly go a long way!
Lavender seeds usually take around one month to fully develop, sometimes even more than that. For best results, start germinating the seeds 8-10 weeks before the weather gets warmer (typically the last day of frost).
It’s advisable to sow your seeds indoors, as they germinate best in a controlled environment. You can also sow them directly in the garden if you wish, but starting them indoors guarantees more successful sprouts in less time.
Growing lavender seeds indoors
Lavender seeds need to stay in a cold environment so they can germinate. This is a process called cold stratification. You only need to do this if you harvest your own seeds. The store-bought lavender seeds in packets have most likely already gone through the process. So, depending on the types of seeds you have, proceed to:
- Soak two paper towels in water and place the seeds between them.
- Seal the paper towels in a zip-lock bag and put it in your fridge for about 3 weeks.
- Get yourself a well-draining seed starter mix and a seed starter tray, or a wide and shallow container.
- Pour the soil into your chosen container, and sprinkle the seeds on top. Plant the seeds 1-2 cm apart if you are using a regular container without divisions. If you opt for the multi-cell starter tray – plant one seed per division.
- Spread a layer of the soil mix over the seeds, ensuring that it isn’t more than 1/3 cm. This is because light needs to reach the seeds.
- Find a sunny and warm spot for the seed tray. Aim to keep them at a temperature of 21°C. This is the best temperature for lavender seed germination. If you find it difficult to maintain this temperature, you can place a heat mat under the seeds.
- Water the soil lightly. Make sure that it’s moist but not soaking wet. If the soil gets too wet and cold, fungus can start to develop, which will be bad news for your seeds.
- Pay close attention to the seed growth and soil moisture over the course of one month. Test the soil’s moisture by pressing a finger into it. If it feels dry to the touch, mist carefully with water.
- Once the seeds sprout out of the dirt, move the container to a spot with direct sunlight. Doing this is important because lavender needs as much light as possible to grow healthily. Alternatively, if you cannot find a sunny location for the seed tray, you can place a grow light over it. Keep it on for about 7-8 hours every day.
Growing lavender seeds outdoors
Directly sowing lavender seeds in your garden may not be as effective. This is because wind and/or wildlife can disturb the whole process. But, if you prefer to plant them in your garden, make sure to do it when the temperature reaches 18-24°C.
- The best soil for lavender is slightly poor in nutrients, dry and moderately fertile. For example, alkaline and chalky soils will work wonders. The plant won’t grow its best in soils that become soaked in water or are very rich in clay.
- Drainage is very important for lavender. Improve it if needed by adding sand or horticultural grit. Lightly scratch the soil’s surface by using a fork tool.
- Spread the seeds out 5 cm apart. Afterwards, you can thin the plants to 46 cm apart. Pat the seeds lightly inside the soil. After that, mist it with water.
You also have the choice to plant the seeds in autumn. Sow them into the top layer of soil. This will naturally make them go through the stratification process due to the winter frost.
How to grow lavender from cuttings
Lavender is very easy to propagate from cuttings. They will easily develop roots in soil that’s rich in nutrients. It will be best if you take cuttings from a healthy lavender plant, anywhere from June to September. Those are the months that lavender is most active.
Lavender can be grown from both softwood and hardwood cuttings. Softwood cuttings are the ones that are taken from a soft and newly developed section of the stem. They usually develop roots in about 2-4 weeks.
However, you can also propagate lavender in the fall and winter. If you choose to do so, it’s better to take thick and established hardwood cuttings. Those cuttings take 4-6 weeks to grow their roots.
The things you need to get started:
- Fully developed lavender plant;
- Sharp cutting tool (either a knife or pruning shears);
- Small pot;
- Potting mix;
- Rooting hormone.
- Check the stems of your lavender plant. They should be straight and healthy-looking, with no pests and no buds. The reason to avoid stems with buds is that blossoms take away the needed energy for propagation. Choose a long stem and look where new growth comes from the older one. You can easily distinguish the two. Old growth is dark brown and harder to touch (hardwood), while new growth is softer and has a light green colour. Select a stem with a decent amount of softwood if you’re propagating in spring.
- Take your previously cleaned and sanitised cutting tool and take cuttings that are 8-10 cm long. We recommend taking a couple of stems from the plant. This will greatly increase the chances of successful growth.
- The last 5 cm from the cuttings should be cleared of all leaves. This will be the part of the cutting that will go inside the soil, so removing the leaves will make the planting easier.
- Fill the pot with the potting mix. Moisten the soil with water. After that, poke holes in the soil by using either a pencil or your finger. Those holes should be a couple of centimetres deep.
- If you decide to use a rooting hormone, dip the ends of the cuttings in it before placing them in the soil.
- Now it’s time to plant the cuttings. Make sure that the bare stems are below the soil level. Carefully pack the soil around the cuttings with your fingers. Ensure that they stay in place.
- Leave the pot somewhere warm, with bright but indirect sunlight. You have to keep the soil moist, but not soaking wet. Keep on checking the cuttings and their soil for the next 2-4 weeks. After the time has passed, try to lightly pull one of the cuttings. If you notice that there is resistance, this means that roots have grown successfully. By this time, you can transfer each cutting into an individual pot or, alternatively, plant them in your garden.
Can I grow lavender from cuttings in water?
Propagating lavender this way is possible. However, it’s questionable whether or not you will have success. Many lavender varieties are vulnerable to rot. This makes maintaining each cutting’s health during the process quite difficult. But, if you have the time and like to experiment, you can give this method a try as well.
- Prepare your cuttings as described previously, and fill a vase or jar with lukewarm water.
- Put your cuttings inside, with the bottom 5 cm of the cutting submerged into the water.
- Leaves must stay out of the water, otherwise, they will rot. It’s important to use clean water for the cuttings.
- Change the water every other day. The whole process may take 2-6 weeks.
How long does it take for lavender to grow?
Lavender is a perennial plant that grows at a slow pace. In some cases, it will be able to bloom in the first year. However, it takes most varieties 3+ years to fully mature.
The growth rate depends mostly on the type of lavender and the conditions in which it’s living in.
Can you make lavender grow faster?
To make lavender grow as fast as it can, you need to make sure that it gets plenty of sun and that its soil drains water quickly.
Keep in mind, that the plant will grow slower and even die if exposed to damp, shady, or extremely cold conditions. We will dive into more detail on how to care for lavender later.
Caring tips for your established lavender plant

Watering
Once lavender matures, it does very well in dry conditions. It needs to be watered on rare occasions if planted in the garden. Severe conditions of drought are exceptions to the rule.
Lavender that is grown in a pot needs to be watered more regularly. This is because they dry out quicker and their roots get less moisture due to the limited amount of soil. For a potted plant, aim to keep the soil fairly dry in the winter, but in a colder room. This will boost lavender’s tolerance to cold temperatures.
Sunlight
A mature lavender plant needs as much sunlight as possible. Full sunlight exposure guarantees that the plant will produce big bushes and lots of buds. It will also greatly reduce the risk of root rot by lowering humidity.
Generally speaking, low temperatures aren’t much of a problem for most lavender plants, as we have already established. Humidity is more of a problem to look out for. Lower humidity levels are what you should aim for. Ensure that your plants have enough space between them to improve air circulation.
If your area experiences strong winter winds, plant your lavender next to a brick or stone wall. This will provide extra heat and overall protection from the wind. If your soil freezes during the winter, apply a layer of mulch. It will protect the plant’s roots and keep them nice and healthy.
Fertilising
Established lavender doesn’t require fertiliser. In fact, you can actually reduce the plant’s potency if you feed it.
Pruning
We highly recommend pruning lavender in late summer, right after the plant’s flowering stage. It promotes new growth, and you will be able to shape your plant nicely.
Tall lavender species can be cut back to around ⅓ of their size. Smaller ones can be pruned a couple of centimetres or cut all the way to the new growth. Cut around 2.5 cm of leaf growth and remove any spent flower stalks.
You can also cut leaves in the spring to shape the plant and remove any leaves damaged by frost, too. An important thing to remember is to not cut back into the woody stems.
How to transplant lavender
Moving lavender to a new location is actually quite simple. Just follow our tips, and you will enjoy your lovely-scented plant in its new space in no time!
For mild climates, lavender can be relocated in spring or fall. However, if your area experiences colder winters, we recommend doing it during spring. Your best bet is to transplant lavender before the weather gets hot. Aim for a day that’s a bit cooler, but not too cold.
Choose a sunny location, prepare the soil and make sure that it drains water properly. Then proceed to:
- Remove any dead or damaged branches and flowers. Water the plant thoroughly.
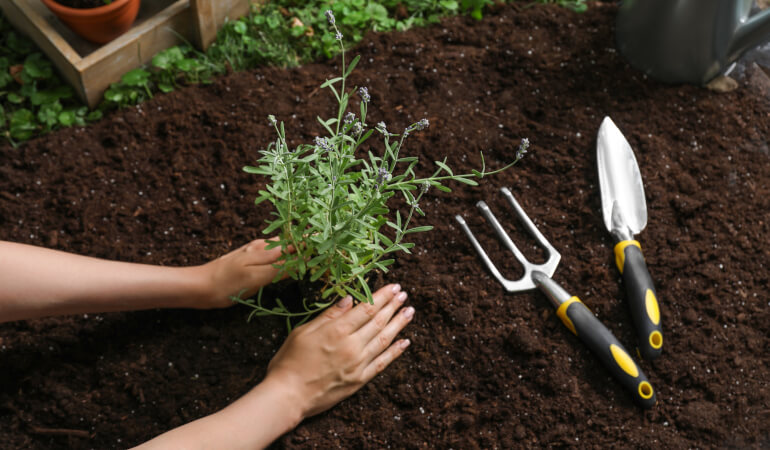
- By using a spade or shovel, dig widely around the plant. Carefully pick the plant up with the soil still intact.
- Dig a hole in the chosen location for the lavender plant. Make sure that the hole’s size is at least two times wider than the roots of the plant. Sprinkle a little fertiliser in the hole.
- Put the lavender plant in the hole, while being gentle with it. Use the previously removed soil to fill around the roots. You have to ensure that the top of the root ball is positioned at the same depth as it was in the previous location. Also, be careful not to cover the crown.
In the first growing season, cut the flowers away. Removing them might seem odd, but it’s actually beneficial to the plant. This way, the energy will be focused on developing strong and healthy roots and leaves. The flowers will also have a nicer shape and scent in the future.
Way to best harvest your lavender

People most commonly grow lavender because of its fragrant flowers that keep their aroma even when dried. Monitor the plant and look when the buds first start to open. This is the best time to harvest the flowers.
How to harvest small amounts of lavender
Firstly, identify the flower you wish to harvest. Follow its stem from the flower bud all the way down to a junction with side leaves, buds, and smaller stems. Make the cut slightly above the junction by using clean and sharp pruning scissors.
Once the main stem with the flower is removed, the energy of the plant will be transferred to the side shoots, which will make them develop their own flowers with time.
Harvesting a bouquet of longer stems with foliage
Follow the main stem of the flower a bit further down. Locate the junction as described above, but cut a little bit deeper this time. You should do this with smaller and more compact lavender plants. Or if you want to cut a tad more from an established plant.
Once you gather your flowers, hang them upside down. The room has to be warm and dry, with good air circulation, for efficient and fast drying.
Common problems you may face
Lavender is generally considered to be a trouble-free plant. You just have to ensure the conditions it enjoys growing in. There are, however, some diseases and pests that can negatively impact the plant and its potency. Give lavender plants a good check from time to time to ensure that you spot an issue early and act accordingly.
Pests attacking lavender plants
- Voles and moles – Moles can eat the plant’s roots and other parts of the plant, while voles can easily damage the root system by digging tunnels. One way to fix the problem is by laying traps. Be sure to determine the type of pest before investing in traps, otherwise, you may waste some money. Another very effective way to deter these invaders is to get yourself a dog or a cat. They are very effective in preventing small animals from destroying your beloved lavender plants.
- Spittlebugs – Also known as Froghoppers, these insects are found to be harmless. They affect many other plants too and produce a foamy substance that encases stems called cuckoo spit. On rare occasions, though, they can cause a bacterial infection called Xylella. It’s generally not advisable to get rid of them, as they rarely damage plants and contribute to wildlife. Some sources suggest spraying those insects and their foam with water, but we don’t recommend doing so. This is because your lavender may get infected with Septoria Leaf Spot, which we will touch on a bit later. If you are worried about the Spittlebugs, an environmentally friendly way to remove them is to simply handpick them from the plant.
- Whiteflies – They are sap-sucking insects, and you can often find them under plant leaves. Whiteflies produce a sugary substance called “honeydew” that attracts other insects, such as ants. This can become a problem for lavender, as it can get infected by different kinds of mould. Sadly, there aren’t many pesticide products that can get rid of whiteflies. But, you can plant other plants near your lavender to attract those insects. Alternatively, you can try applying neem oil or remove the whiteflies by hand.
- Fire ants – Fire ants can create a nest below a lavender plant and make tunnels around its roots. This will unfortunately cause the plant to collapse and eventually die. To check if you have such a problem, you will have to dig around and lift the plant up. A clear sign of infestation will be fire ants pouring out of the hole where the plant has been. One way to deter fire ants is to water the soil thoroughly once it has dried. However, as we mentioned before this might create more problems for lavender. The best thing you can do is to purchase an insecticide, specifically formulated for fire ants. If you prefer a more natural approach – spread a layer of diatomaceous earth over ant mounds and pathways.
Lavender diseases
- Septoria leaf spot – This fungal disease can affect only lavender plants. When your plant is infected, you will start noticing small grey spots on its leaves that eventually spread out and destroy them. The best way to prevent the Septoria leaf spot is to keep the foliage dry. Don’t overcrowd lavender and prune the inside branches occasionally to avoid humidity. If your plant is already affected – remove the infected leaves. You can also use neem oil and copper to kill the illness.
- Alfalfa mosaic disease – This is considered to be one of the most damaging diseases that can infect lavender. It can be caused either by aphid infestation or by pruning the plant with dirty tools. The ways to avoid it is to sanitise your cutting tools and wear gloves when dealing with plants. Look out for the presence of aphids as well. You should also scan the area around the plant regularly and remove any nearby weeds. If your lavender plant is infected by this sickness, there’s unfortunately nothing you can do about it. Remove the plant entirely, as the disease can spread to your other plants too. Carefully dispose of everything. Ideally, you would like to burn ill plants if you can.
- Root rot – Rotting is caused by fungi infecting a plant’s soil. This is a typical problem for lavender if it isn’t planted in the correct conditions. Once fully grown, you can almost neglect the plant, and it will do just fine. If the plant is already affected by root rot, remove the infected areas, uproot it, and plant somewhere sunny and dry.
- Shab – Yet another fungal disease. It is spread by the wind. It affects the woody branches and green stems of lavender, making them brown in colour with black spots. This disease is not so common in the UK, however, there is still a slight chance of your lavender getting infected by it. Make sure to get disease-free seeds, or avoid taking cuttings from an infected lavender plant. French lavender is immune to shab, so it might be a good idea to consider this variety of the plant. This is another illness that you cannot cure, so just as with Alfalfa mosaic, dispose of everything and wear gloves.
- Botrytis – An early sign of this disease is the foliage on the base of the plant turning grey. Botrytis is yet another fungal illness that can affect a vast range of plants that are grown in a humid area with limited airflow. Lavender’s leaves will turn yellow, wilt, and die. Cut away the infected areas and spray a fungicidal product to limit the spread of the disease.
Need a professional gardener?
Enter your postcode to view our rates and availability in your area.
For questions about the services we offer visit our main site
Takeaways
- Lavender does not favour humidity so avoid overwatering.
- Be mindful of lavender’s location. It needs plenty of sunlight and dry conditions.
- You will have more success growing a lavender plant from cuttings when compared to growing it from seed.
- Check and choose a sturdier lavender species if you’re worried about diseases and pests negatively impacting it.


